
|
Re: H2 camera installation
NICSH
:D |
Re: H2 camera installation
Thanks, When are you going to do yours?
|
Re: H2 camera installation
All you need to do is put in one normal 12v relay.
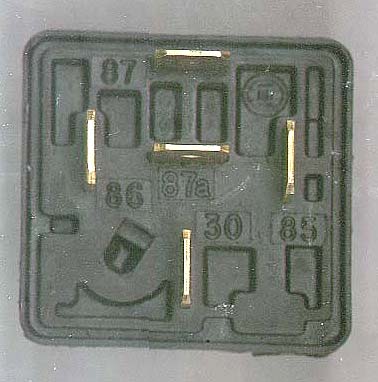 The connections are: 85 negative 86 12v + that gets hot when you flip a switch 87 12v + 87a 12v + that gets hot when you put it in reverse 30 goes to the 12v + of the screen (normally 87a and 30 would be the same wire connected together) Under normal circumstances the reverse light will turn on the screen. If you want to see it while driving, flip the switch and it will come on but not backfeed to the reverse lights. It works like a charm, I have it wired up this way. I have the same camera but with the little screen that attaches to the windshield. The switch and relay is inside the overhead console. No problem. |
Re: H2 camera installation
I've had both front and rear cameras that are integrated into my factory NAV system for some time now. The rear camera is set up the same as discussed here in that it comes on automatically when the truck is in reverse. Both cameras may also be activated manually at any time via two switches (one for front camera & one for the rear). I mounted these switched on the rear of the overhead console. The cameras are great for viewing objects in front and rear that you cannot see from the drivers seat and are also valuable when lining up my rig to attach the trailer to either the front or rear hitch. To compensate for the lack of depth perception inherent with camera views I've also installed backup sensors in both the front & rear bumpers. These sensors are equipped with two digital displays (one for front & one for rear) that display the distance away from object in increments of 1/2' to 6' along with providing an audible warning relative to how close I am to an object. These two displays are mounted to the inside windshield at the top left corner. The sensors are triggered in the exact same way as the cameras - the rear sensors are automatically activated when in reverse and both front & rear sensors can be manually activated at any time via the switches mentioned above. I mounted two sensors in the rear bumper, one at each corner but was unable to mount one in the center of the rear bumper due to inaccurate readings caused by the rear mounted spare tire. Will probably just add a hitch mounted rear sensor in the future. I love this setup.:D :D :D :D
|
Re: H2 camera installation
i was in the process of using that pac adapter for the stock headunit for a similar setup but couldn't get it to ork properly. Did you install it yourself?
I ask because its kinda tricky, i guess, however, not very difficult. I could get the image to return back to normal with the adapter. The screen would shift, blink, roll around on the screen, thus not allowing the stock nav functions to be utilized. I'm not sure if it was defective but i just returned it and considered that its just a "ok" product. got any feedback on that unit? thanks! |
Re: H2 camera installation
Quote:
I installed mine last year and worked fine and have not read of anyone having problems..... |
Re: H2 camera installation
well, i guess im the only idiot that got the install wrong!! :)
i haven't tried after the initial attempt, however, i was at it for about 6-8hrs and i couldn't get it to work. Maybe it was a bad unit, but i gave up on it... im thinkin of going to a pioneer Z1 and see what i can with that.. |
Re: H2 camera installation
it is a very easy install for the pac unit i actually had to install it twice after my first head unit took a dive. i removed it and sent it back got the new unit and installed it in there and no problems. the directions are pretty straight forward.
on the other hand the avic-z1 is also a nice unit but you will have to bypass some things if you want the unit to play when not in park. check out this site http://www.avic411.com you can find some great info on all the pioneer units |
| All times are GMT +1. The time now is 10:53 AM. |
Powered by vBulletin Version 3.0.7
Copyright ©2000 - 2025, Jelsoft Enterprises Ltd.